I’m admittedly not a handy person, but I live alone and so need to do some basics. These might be easy for most people, but I figured there are others out there like me. My latest project was to replace my cable cord that was conveniently stapled along the baseboard. This was done when the cable was installed, very easily by the amazing Verizon Fios rep — he even helped me pick out paint colors! Talk about full service.
So why am I having to replace the cord? No, I didn’t move my TV. I came home one day from work and found that my puppy Gatsby had chewed on the baseboard, pulled out the cable (including some of the staples), and then chewed on the cable itself.

After checking his mouth for cuts, I looked to see if the cable was still working. Thankfully — for Gatsby — it did. So I covered the cord with a towel and proceeded over the next week to collect supplies.
Step 1: Assemble supplies.

OOOoops… I mean these supplies:

Cable Install Supplies
Shown here: hammer, needle-nose pliers, 50-ft. cable cord, and cable clips.
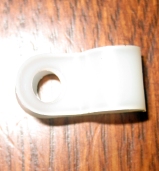
When I went to the hardware store I was looking for a staple gun and brought one of the plastic covered staples as an example of what I wanted. After talking to a few of the people there, I selected the cable clips that could be hammered in. (I had used a staple gun before — a whole other story — and really didn’t have enough hand strength to get the staples in correctly).
Step 2: Remove staples

Picture of the how the cord was installed by Verizon with plastic covered staples.
I used the needle nose pliers to pull out the staples.
Step 3: Wipe down baseboard.
There was a lot of dust collected under the cord, so I took the opportunity to clean everything with a damp cloth.
Step 4: Hammer down clips.

I started on one end, clipped on the cable clips and hammered them into the top of the baseboard. The direction on the box showed to hammer the cord to the side, but I wanted to cover the staple holes.* I found it easiest to pull the cord on the loose side while hammering the clip down from the side (that way you are less likely to hit the wall).
Helpful Hints
1. Drink the wine after you’re done using the hammer.
2. Repair any damages to the baseboard before you install the cord. I didn’t have the supplies to repair where Gatsby ate the baseboard, so didn’t do this. I will have to remove a few of the clips to do this in the future. Also, I didn’t fill in the staples holes. If I did this over again, I think just a little paint would cover them up.*
3. MAKE SURE THE CABLE CORD IS LONG ENOUGH! I had a cord leftover from a previous apartment and had planned to use it. Thankfully last minute I tested to see if it was long enough. I wasn’t. What I didn’t do was measure how long that cord was or what length I needed. I guesstimated it was 20-ft. long. I bought a 50-ft. cord. I originally had a 25-ft. cord in my cart, but was worried enough that it might not be long enough that I got the next size up. I figured it didn’t hurt to have the extra wound up behind my TV stand.
4. Be ready to make “other” repairs. I hit the wall a couple times and took off a bit of paint, so I need to touch that up.
I’m writing this post while watching the TV, which seems a bit clear now that the copper cord isn’t exposed!
UPDATE: At 8:31 am the next morning, I heard an interesting sound from the living room. I caught Gatsby in the act!!! He was going after the new cord – the little shit! I thankfully had bought a new bone that said it was for “powerful chewers” and it was bacon flavored–yummmmm. So I got that out and so far it’s distracted him. I sprayed the new cord down with Bitter Apple. Hopefully one of these days I can write a “How-To” for stopping your dog from chewing!


